Preferences - Label Printing
You can set up a label printer to enable label printing when you book an appointment.
Training Tip - System wide settings are indicated by a building  , and user specific settings are indicated by a person
  .
.
To set up your label printer:
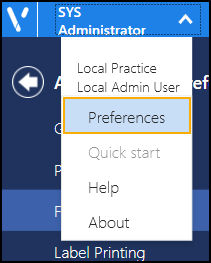
- From Appointments, select the arrow next to your name and select Preferences:
- The Appointments Preferences list displays, select Label Printing:

- Complete as required:
- Practice default - Select the default printer required
- User override - Select a different printer if you want to print elsewhere
- Footer text - Enter any text you want to add to the bottom of the Appointment label, for example, opening hours or branch address
- Select Save
 to save any changes made, and then select the back arrow
  to close the Appointments Preferences screen.
Note - You are prompted to save any unsaved changes if you try to exit without saving. Alternatively, to quickly reverse any unsaved changes made, select Reset  .
.
.Note - To print this topic select Print  in the top right corner and follow the on-screen prompts.